
What are your first thoughts after you heard “CMS migration”? Obviously a long and tiring process of “packing all the website stuff” comes to your mind. But in today’s machine-oriented world, more and more people opted for automated tools which simplify all the complicated work. Mark Goddard once said, “Let the machine take care of the machine, and you go spend more time with family”.
In this guide, we gathered all the necessary information which covers every stage of moving a website to Joomla CMS in a fully automated way.
Pre-Migration Steps
Joomla Installation: Domain & Hosting
- Obviously, running a proper Joomla website demands efforts and money. To start a Joomla installation on a web server, first, you need to download the Joomla installation package. The most reliable source for doing this is the official Joomla website. The file will be saved in a zip format and it will contain the latest Joomla version.
- The Internet is overflown with tons of websites, but due to the fact that each has a unique name, people can easily find the one needed. The domain name is one more important stage in creating a Joomla website. The market of domain companies offers different options of domain names to buy, starting with 1$ more per month.
- The next step to do in installing your Joomla website is to buy hosting for the website. It provides storage for your content and displays it to the visitors. On average a reliable hosting will cost you 6-7$ a month. Regarding on your budget and requirements you can choose the most suitable hosting for you.
- For proper Joomla installation, your system needs to meet some of the technical requirements. Make sure all of them are provided and finish the installation process.

Joomla Design
Doubtless, good design is a paramount part of web development. You can have all the functionality you want, but if your website isn’t eye-catchy, visitors won’t stay on it for long.
As a default, Joomla offers you two templates to choose from, but there are collections of both free and paid templates which you can add to your Joomla website.

Note, in case you are going to migrate with CMS2CMS automated service, ONLY content! will be transferred to another platform. Not your theme, not your colors, not your layout.
Enhancing Joomla Functionality
As a rule, the first and foremost tool to expand a website functionality is a plugin. In “Joomla World” they are called extensions. When looking at Joomla Extensions Directory page, there are 34 different addons categories where you might find, add or improve the functionality your website lacks in. In general, there are 7849 extensions in total (almost half of them are free). Joomla is known for its ability to build large websites with letting you keep control over large data amount.
Migration to Joomla
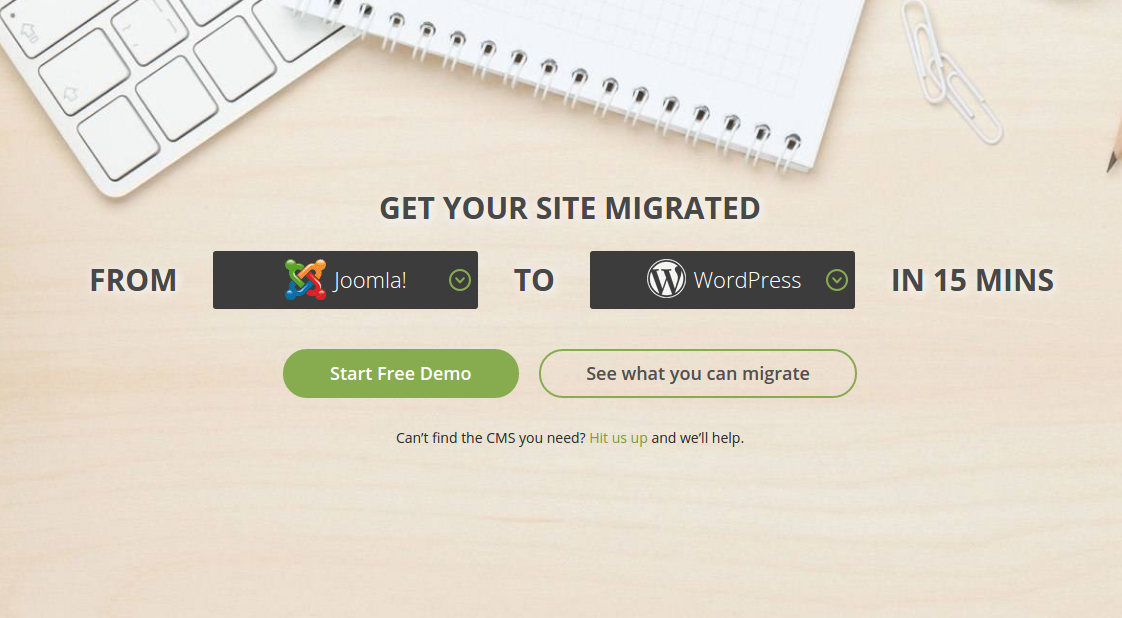
CMS2CMS is an automated migration service with the main aim to make a website migration as easy as 1,2,3. After just a few clicks your Existing website will be on another CMS platform without any data loss. Below, you will find the complete instruction for the automated migration to Joomla CMS.
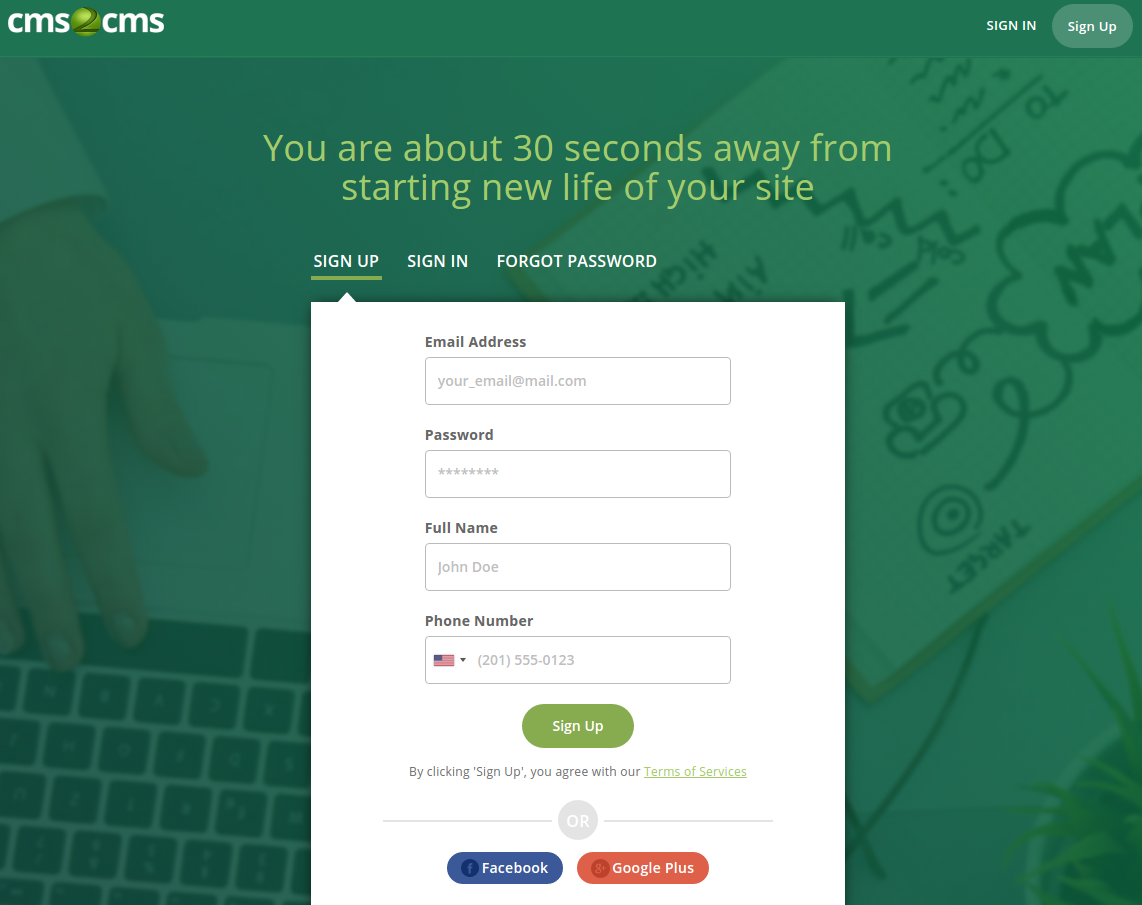
Register an Account
To start the migration process, you need to login or create a new CMS2CMS account. Provide your name, email, phone number, choose a password – and you’re registered. As an alternative, you can sign up using your existing Facebook or Google+ account.
Specifying Your Existing Website Details
Selecting the Type of Existing CMS Platform and Provide Its URL
Now, select your CMS platform type and specify the URL of your Existing website in the provided field in the migration wizard.
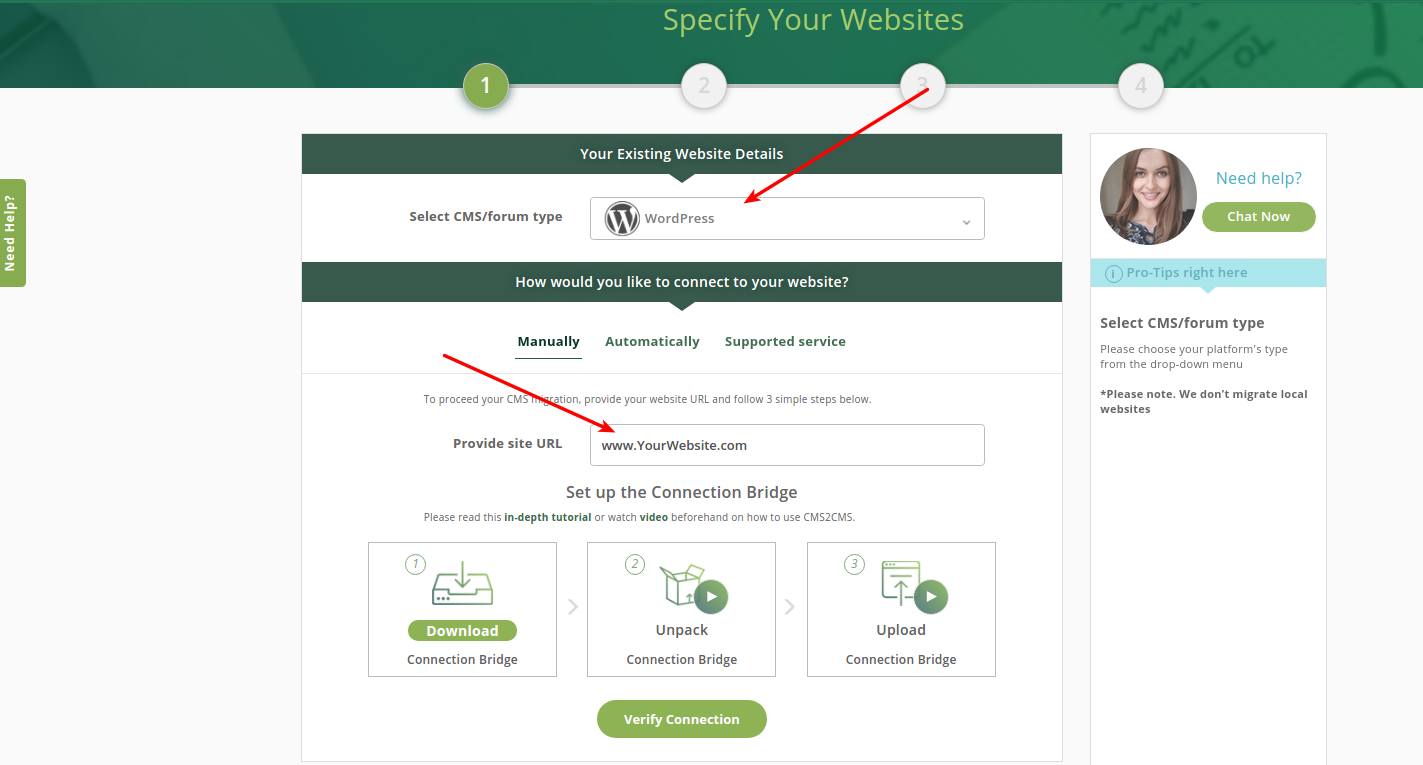
Establish the Connection to Your Existing Website
Now you are given three options to choose from. You can migrate your site to Joomla:
-
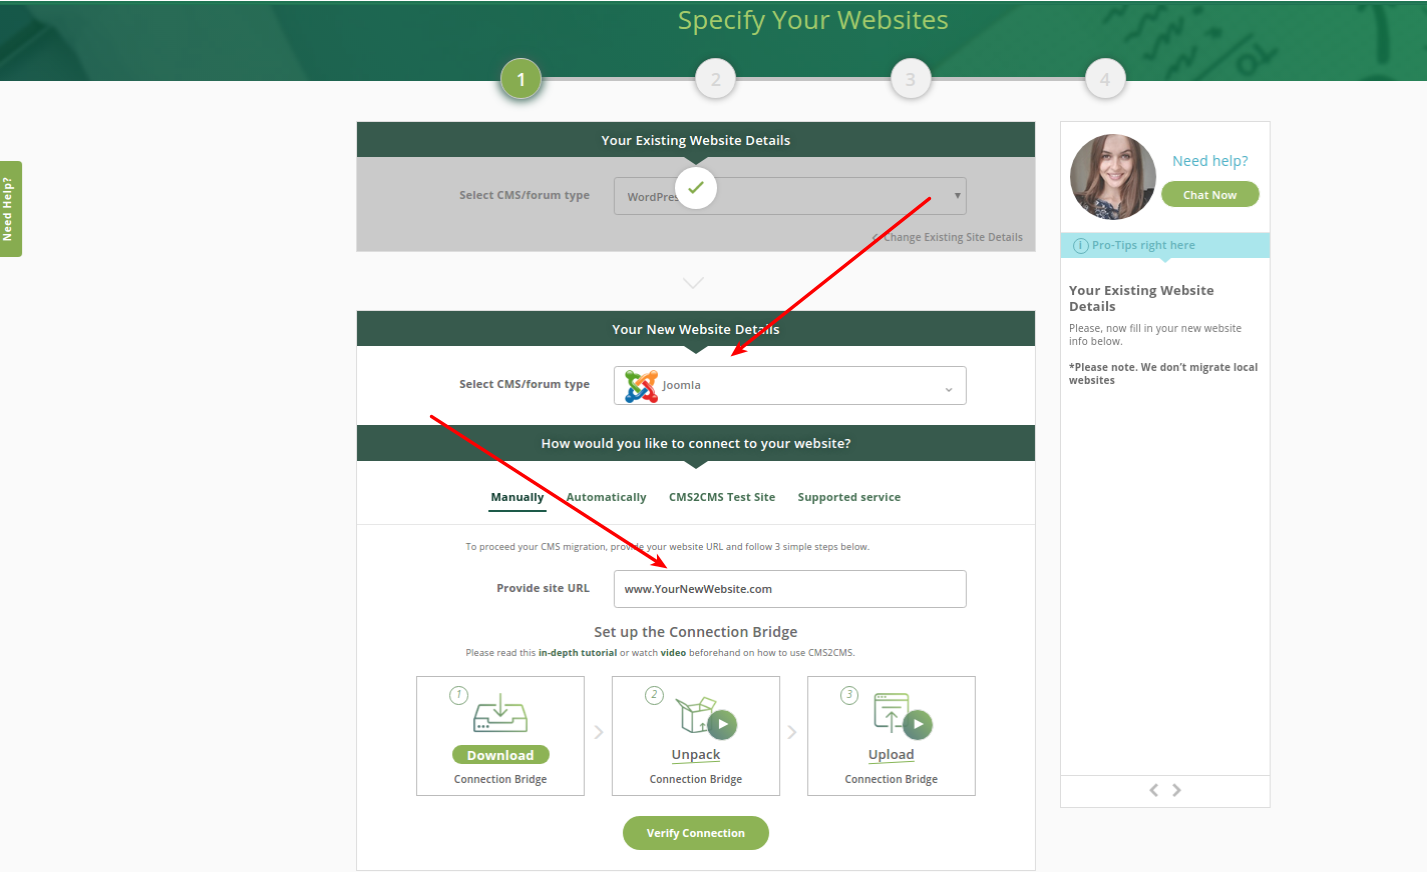
Manually
Manual migration requires the connection bridge installation. So, click the corresponding button and download the connection bridge file to your local computer. The bridge file will be saved as “cms2cms.zip”. You will need to:
- Extract the files to the corresponding folder on your computer.
- Connect to your current website via FTP. You can do it with any type of FTP client software, like FileZilla. To connect to your website, you will need to specify your hostname, which you can find out from your hosting provider. Then provide your FTP access login and password.
- After that, right within your FTP client dashboard, open the root directory of your site. It is the top folder with the index.php file. Then, copy the “cms2cms” folder that you’ve extracted from your bridge file previously and paste it to the root folder.

Now when the connection bridge is already installed on your Existing site, press “Verify Connection” button in the migration wizard.
Once the whole process of your website migration is complete, you can remove the connection bridge.
Note: There is no need to download the connection bridge when migrating from such CMSs as Wix, Squarespace, Weebly, Blogger, Jimdo, Umbraco, DNN, etc.
-
Automatically
It is possible to install the connection bridge without manually downloading and uploading it to the root directory of your site. Choose the automatic migration and provide your FTP access data – host, port, login, and password. You can ask your hosting provider for all the necessary FTP data.
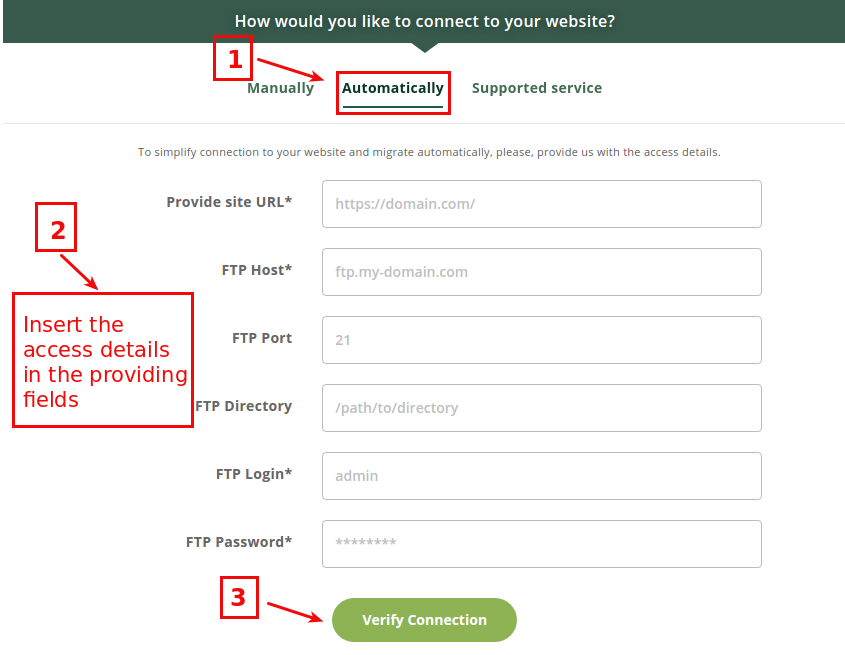
Now when you have entered the valid FTP details into corresponding fields, press “Verify Connection” button in the migration wizard.
-
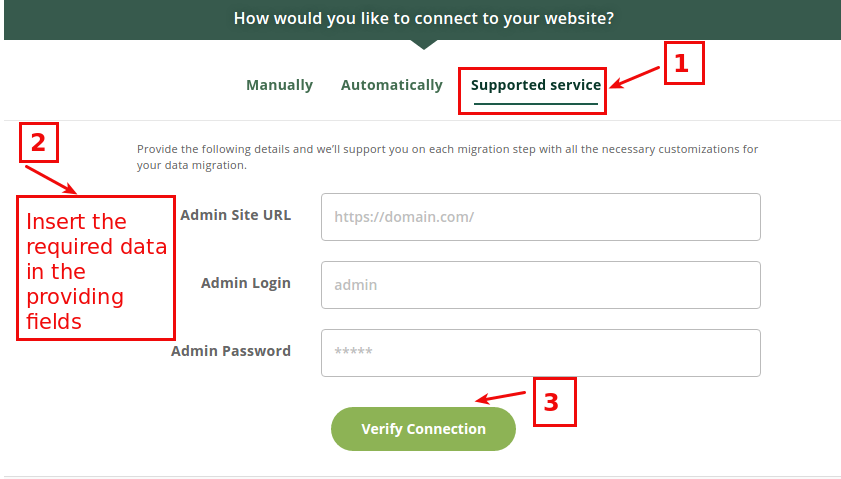
Supported Service
In case you need custom migration or you have some specific requirements, you can easily order a Supported Service Package right in the migration wizard. Provide the login and password to the admin panel of your Existing website and press “Verify Connection” button. After ordering Support Service Package you’ll receive the confirmation email from CMS2CMS Support Team
Specifying Your New Website Details
Selecting the Type of New CMS Platform and Provide Its URL
Now when you have verified the connection to your Existing website, select your New CMS platform type and specify its URL in the provided field in the migration wizard.
Establish the Connection to Your New Website
To make your migration to Joomla comfortable, on this step you also have the opportunity to choose the easiest way for you. There are four paths you can go by: manual or automated way, ordering a Supported Service Package and migration to CMS2CMS Test Site.
-
Manually
CMS2CMS offers you the opportunity to choose between the installation of the Connector Extension or the Connection Bridge. Due to this, here you have to select the one you are the most comfortable with. 
Connector Extension
By clicking the “Download Connector Extension” button, you will be asked to save the file to your local computer. It will be saved in a zip format containing cms2cms-connector-extension folder.

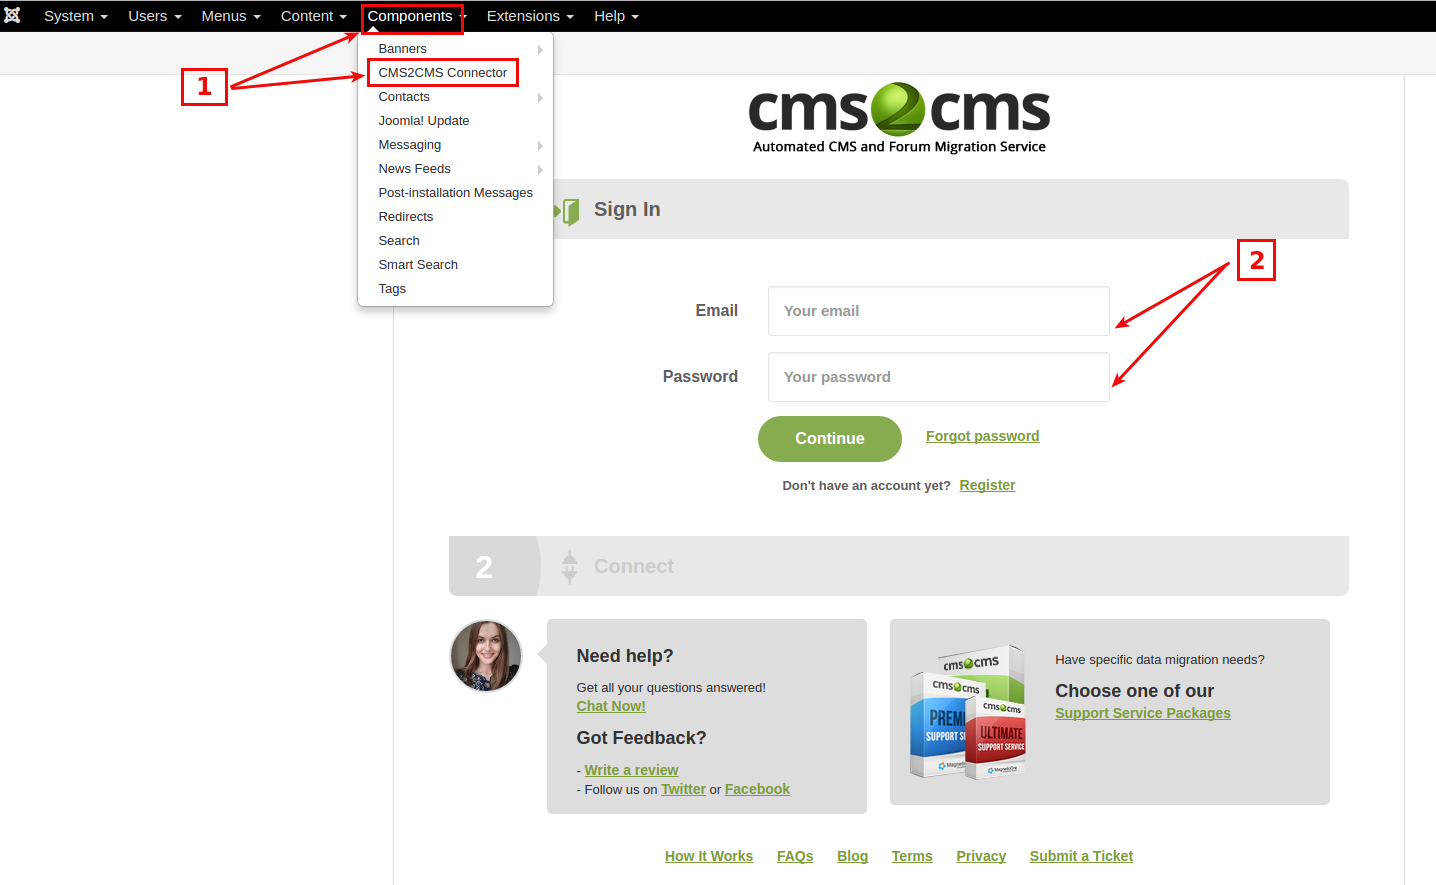
Your next step will be to upload the CMS2CMS Connector Extension to your Joomla site. Go to Extensions on your admin dashboard choose, the previously saved zip file from your computer, and click Upload and Install button.
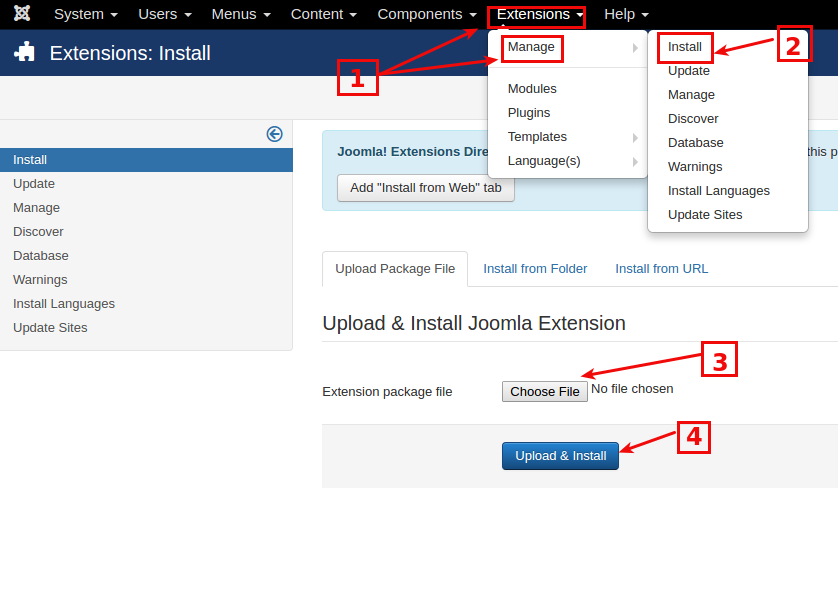
Click on the extension and log into CMS2CMS. Now you can proceed with your migration.
 Prefer watching a video instead of following written instructions? Don’t miss the chance to watch a tutorial on how to migrate to Joomla with the help of the Connector Extension:
Connection Bridge
Choosing this way of migration implies the connection bridge installation. Download the connection bridge file to your local computer and the file will be saved as “cms2cms.zip”. Take the following steps:
- Extract the files to the corresponding folder on your computer.
- Connect to your New Joomla website via FTP. You can do it with any type of FTP client software, one of which is FileZilla. To connect to your website, you will need to specify your hostname, which you can find out from your hosting provider. Then provide your FTP access login and password.
- After that, right within your FTP client dashboard, open the root directory of your New WP site. It is the top folder with the index.php file. Then, copy the “cms2cms” folder that you’ve extracted from your bridge file previously and paste it to the root folder.

When the connection bridge will be installed on your New Joomla website, click “Verify Connection” button in the migration wizard.
You can remove the connection bridge, once the whole process of your website migration is complete.
-
Automatically
It is possible to install the connection bridge without manually downloading and uploading it to the root directory of your site. Choose the automated way of the migration and provide your FTP access data including host, port, login, and password by yourself. You can ask your hosting provider for all the necessary FTP data.
Now when you have entered the valid FTP details into corresponding fields, press “Verify Connection” button in the migration wizard.

-
Supported Service
If you have some specific requirements or need a custom migration, you can easily order a Supported Service Package right in the migration wizard. Provide the login and password to the admin panel of your Existing website and press “Verify Connection” button. All you need to do after that is to wait for the confirmation email.

Even if you don’t have your Target CMS (the one you’d like to migrate to) installed and live, you can still try how easy it is to migrate your data with CMS2CMS. After the migration is performed, you can get your content by downloading it as a dump file.

Remember that the data from the test site is deleted within 7 days after the migration unless you request it to be removed right away.
Note that in case you perform Full migration to CMS2CMS Test Site, you will be charged $5 in addition to the complete price of your migration.
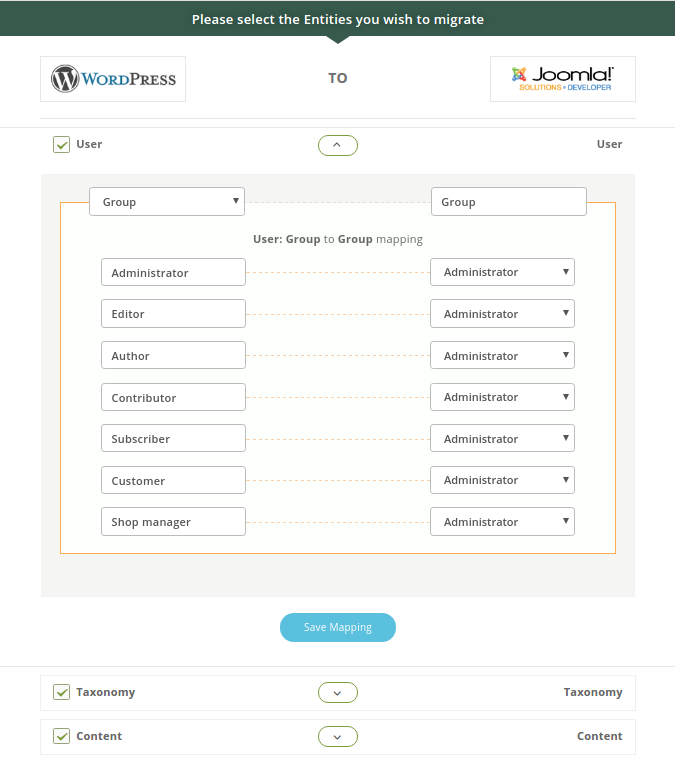
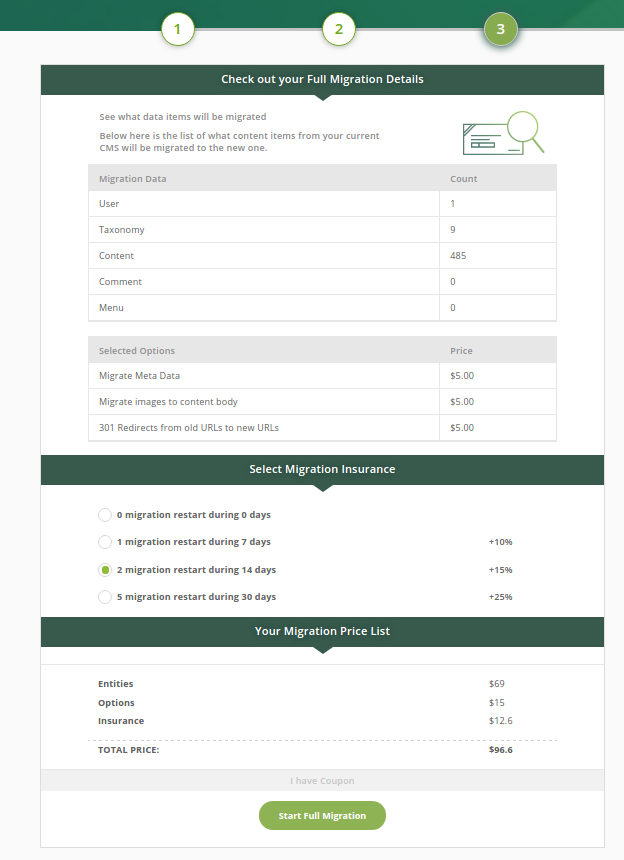
Choosing Entities that should Be Migrated
Now, when the connections between your sites are verified, it’s high time to select what data you are up to transfer to the New Joomla website. CMS2CMS service offers you the possibility of mapping content, what means that while migrating from any CMS platform to Joomla you may specify where you wish your content be relocated to.
Note that when you are going to migrate comments to Joomla CMS there is the need to install JComments Joomla extension. After activating the JComments extension on your new Joomla website, select the entity “Comment” in the Migration Wizard and proceed with the migration.
Selecting Additional Options
CMS2CMS allows you to choose the additional options to migrate if it’s needed. This feature increases the benefit of your migration process. There are a few options you can choose from:
-
Migrate Meta Data
Choosing this option implies that your Existing website’s SEO rankings will be preserved. Meta keywords, meta title, and meta-description will be migrated from your Existing CMS to the New Joomla website.
This option allows you to migrate images and such attachments as PDF, MP3, CSV, TXT files, included in the content body of your Existing website to the content body of your Joomla site.
Automated 301 Redirects option preserves and transfers URLs and SEO rankings from your Existing website to the New Joomla site.
Note: While moving your website data from your Existing CMS to Joomla and preserving the SEO links, there is a need to install ReDJ Joomla extension before the migration. In this way, you will ensure that all your current website links will redirect to the New one and SEO juice will be preserved.
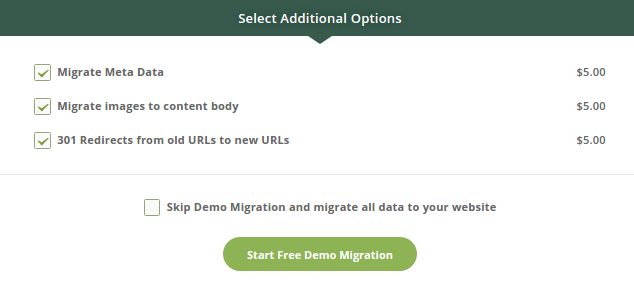
Demo Migration
In order you could look at the work of CMS2CMS service before making payment, we enable you to run Free Demo Migration. You’ll be able to track the migration process right in your browser window and check out the results when Demo Migration complete!
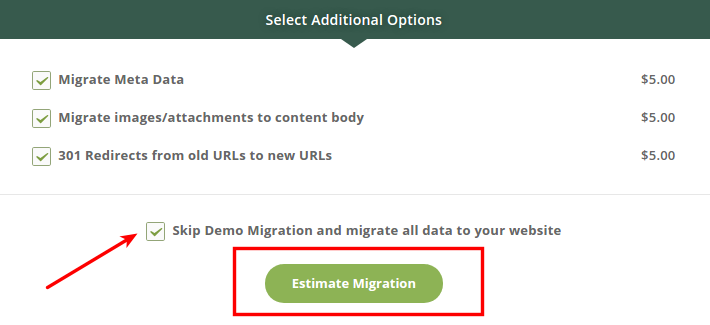
But if you’d like to migrate all of your content right away, you may skip this step and launch the complete migration. You can also calculate the approximate price for your complete migration to Joomla by clicking “Estimate Migration” button.
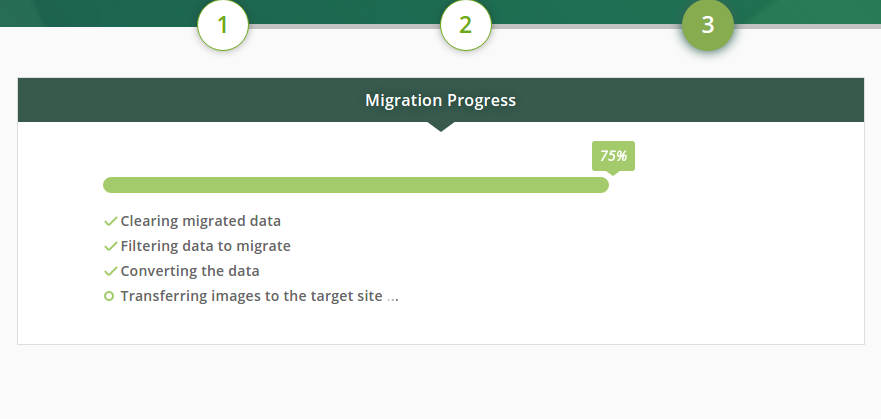
Complete Migration
And the final step to take for the automated move to Joomla is to start your Complete Migration. If there are not enough funds on your account, you’ll be asked to credit it. Also, if you’ve got a discount coupon code, press the corresponding button and enter the code in the specified field.

To perform your Complete Joomla migration:
-
Select the additional options needed.
- Migrate Meta Data
- Migrate Images & Attachments to Content Body
- 301 Redirects from Old URLs to New URLs
-
Choose the migration insurance.
CMS2CMS service gives you an opportunity to restart the same migration process in order all the pieces of your content were safely transferred to the new platform. You can resume your CMS migration up to 5 times in just a few mouse clicks, depending on the Migration Insurance Plan you’ve chosen on migration Wizard. By doing this, you will save your time and money, as well as stay calm despite the unpredictable circumstances.
-
Check how much it will cost.
In general, total migration cost depends on the quantity of content pages and entities for migration. But you can calculate the exact price of your migration heretofore using Migration Estimator.
-
Press “Complete Migration” button.
When the transfer is complete, you will receive an email notification and be able to check out the new look of your New Joomla website.
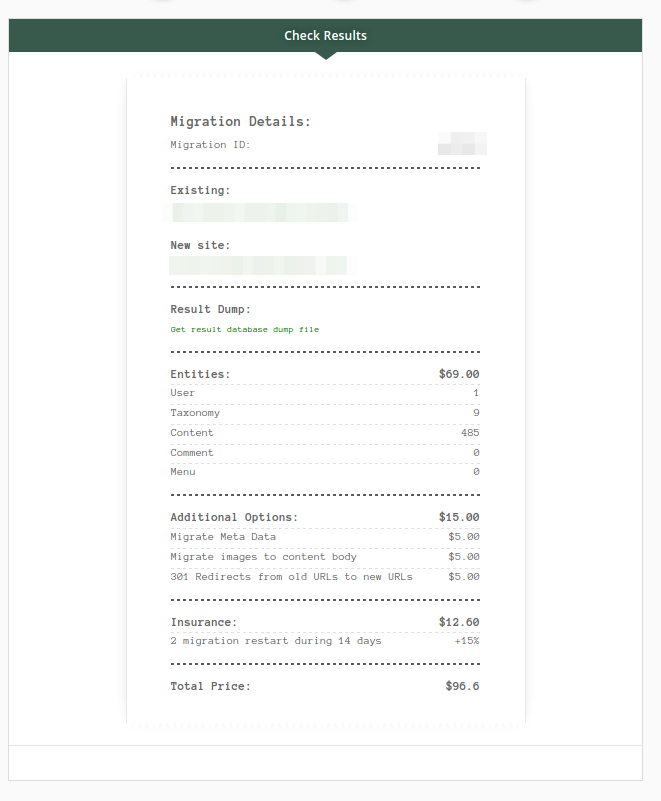
Checking out the Migration Results
When the migration process is finished, you will be given a check with all the migration details provided.
Two Ways to Add Funds to Your Account
- The first method of adding funds to your account is the following. Within your dashboard, after you’ve Signed In/Up, click on the “Add Funds” button and enter the amount of money you want to add to your account. When ready, you’ll be redirected to CMS2CMS Secure Checkout to proceed with the payment process. There you’ll be required to fill in “Billing Information” and “Select a Payment Method” (like adding funds with a credit/debit card or PayPal or any other way) fields.
- The second way to add funds to your account is more direct. Just after the Demo Migration is finished, click on a “Complete Migration” button and you’ll be redirected directly to CMS2CMS Secure Checkout where you will need to provide your “Billing Information” and “Select a Payment Method” (like adding funds with a credit/debit card or PayPal or any other way).

Common Errors you may face during the Website Migration
- Bridge permission error states that the permission values are set in a wrong manner. To solve the issue, make use of the instruction.
- 401 error Unauthorized indicates that your website content is not available on the Internet during the Migration process. To solve it, look through the suggestion.
- 403 Forbidden error means that access to some files or folders is limited. Have a look at what can be done, to resolve the issue.
- 413 kind of error denotes that the request is too large for your particular server. To get around the problem, try these solutions.
- 500 Server Error declare that the permissions for bridge folder are incorrect. Here you can find possible outcomes for the problem.
Post-Migration Steps
Preview the Migration Results
The first action to be taken after the website migration is checking out the results. Find out if everything works well. Check whether all the migration data is accurate and in the appropriate format. Try to look at your new website, they way a user will look at it and think whether it’s eye-catchy enough.
Ensure the Security of the Website
It is vital to invest some time to strengthen the protection of your Web home to avoid possible future hacker attacks. Undoubtedly, you already know some of the basic security tips such as secure login credentials, installing security extension and backup.
Data and System Optimization
Website migration process is a complicated task and despite all your preparations, there surely will be a few things you will have to adjust after the data transfer. Basically, Joomla CMS is not a slow platform but if to overload it with images, this can change. So, in case you’ve chosen this platform to run a website on, it still makes sense to optimize your images and make your Joomla site even faster. Here are some extensions which can be helpful for you.
Monitoring Your Site via Google Analytics
In case you want to monitor all your website’s statistics, Google Analytics is probably the best way to do that for free. It allows you to track the online performance, monitor your traffic and analyze the behavior of your visitors.
Bottom Line
All the information mentioned above was compiled for making your migration to Joomla CMS as easy and painless as it’s possible. Hopefully, this guide will be useful and quite informative for you.
Remember, that CMS2CMS, an automated CMS migration service, constantly improves its work by adding more advanced options to supply you, our precious clients, with even easier migration process. We are offering you 24/7 high-quality support. Thus, in case you have any questions or suggestions, feel free to contact us.